What is chaincode?
Chaincode is a piece of code that is written in one of the supported languages such as Go or Java. It is installed and instantiated through an SDK or CLI onto a network of Hyperledger Fabric peer nodes, enabling interaction with that network’s shared ledger.
There are three aspects to chaincode development:
- Chaincode Interfaces
- APIs
- Chaincode Responses
Chaincode interfaces
A chaincode implements the Chaincode Interface that supports two methods:
InitInvoke
Init()
Init is called when you first deploy your chaincode. As the name implies, this function is used to do any initialization your chaincode needs.
Invoke()
Invoke is called when you want to call chaincode functions to do real work (i.e. read and write to the ledger). Invocations are captured as transactions, which get grouped into blocks on the chain. When you need to update or query the ledger, you do so by invoking your chaincode.
Dependencies
The import statement lists a few dependencies for the chaincode to compile successfully.
- fmt – contains
Printlnfor debugging/logging. - errors – standard go error format.
- shim – contains the definitions for the chaincode interface and the chaincode stub, which are required to interact with the ledger.
Chaincode APIs
When the Init or Invoke function of a chaincode is called, the fabric
passes the stub shim.ChaincodeStubInterface parameter and the
chaincode returns a pb.Response. This stub can be used to call APIs
to access to the ledger services, transaction context, or to invoke
other chaincodes.
The current APIs are defined in the shim package, and can be generated with the following command:
godoc github.com/hyperledger/fabric/core/chaincode/shim
However, it also includes functions from chaincode.pb.go (protobuffer functions) that are not intended as public APIs. The best practice is to look at the function definitions and comments in interfaces.go and the examples directory.
Response
The chaincode response comes in the form of a protobuffer.
message Response {

    // A status code that should follow the HTTP status codes.
    int32 status = 1;

    // A message associated with the response code.
    string message = 2;

    // A payload that can be used to include metadata with this response.
    bytes payload = 3;

}
The chaincode will also return events. Message events and chaincode events.
messageEvent {

    oneof Event {

    //Register consumer sent event
    Register register = 1;

    //producer events common.
    Block block = 2;
    ChaincodeEvent chaincodeEvent = 3;
    Rejection rejection = 4;

    //Unregister consumer sent events
    Unregister unregister = 5;

    }

}
messageChaincodeEvent {

    string chaincodeID = 1;
    string txID = 2;
    string eventName = 3;
    bytes payload = 4;

}
Once developed and deployed, there are two ways to interact with the chaincode - through an SDK or the CLI. The steps for CLI are described below. For SDK interaction, refer to the balance transfer samples. Note: This SDK interaction is covered in the Getting Started section.
Command Line Interfaces
To view the currently available CLI commands, execute the following:
# this assumes that you have correctly set the GOPATH variable and cloned the Fabric codebase into that path
cd /opt/gopath/src/github.com/hyperledger/fabric
build /bin/peer
You will see output similar to the example below. (NOTE: rootcommand below is hardcoded in main.go. Currently, the build will create a peer executable file).
Usage:
      peer [flags]
      peer [command]

    Available Commands:
      version     Print fabric peer version.
      node        node specific commands.
      channel     channel specific commands.
      chaincode   chaincode specific commands.
      logging     logging specific commands


    Flags:
      --logging-level string: Default logging level and overrides, see core.yaml for full syntax
      --test.coverprofile string: Done (default “coverage.cov)
      -v, --version: Display current version of fabric peer server
    Use "peer [command] --help" for more information about a command.
The peer command supports several subcommands and flags, as shown
above. To facilitate its use in scripted applications, the peer
command always produces a non-zero return code in the event of command
failure. Upon success, many of the subcommands produce a result on
stdout as shown in the table below:
Command | stdout result in the event of success |
|---|---|
version | String form of peer.version defined in core.yaml |
node start | N/A |
node status | String form of StatusCode |
node stop | String form of StatusCode |
chaincode deploy | The chaincode container name (hash) required for subsequent chaincode invoke and chaincode query commands |
chaincode invoke | The transaction ID (UUID) |
chaincode query | By default, the query result is formatted as a printable |
channel create | Create a chain |
channel join | Adds a peer to the chain |
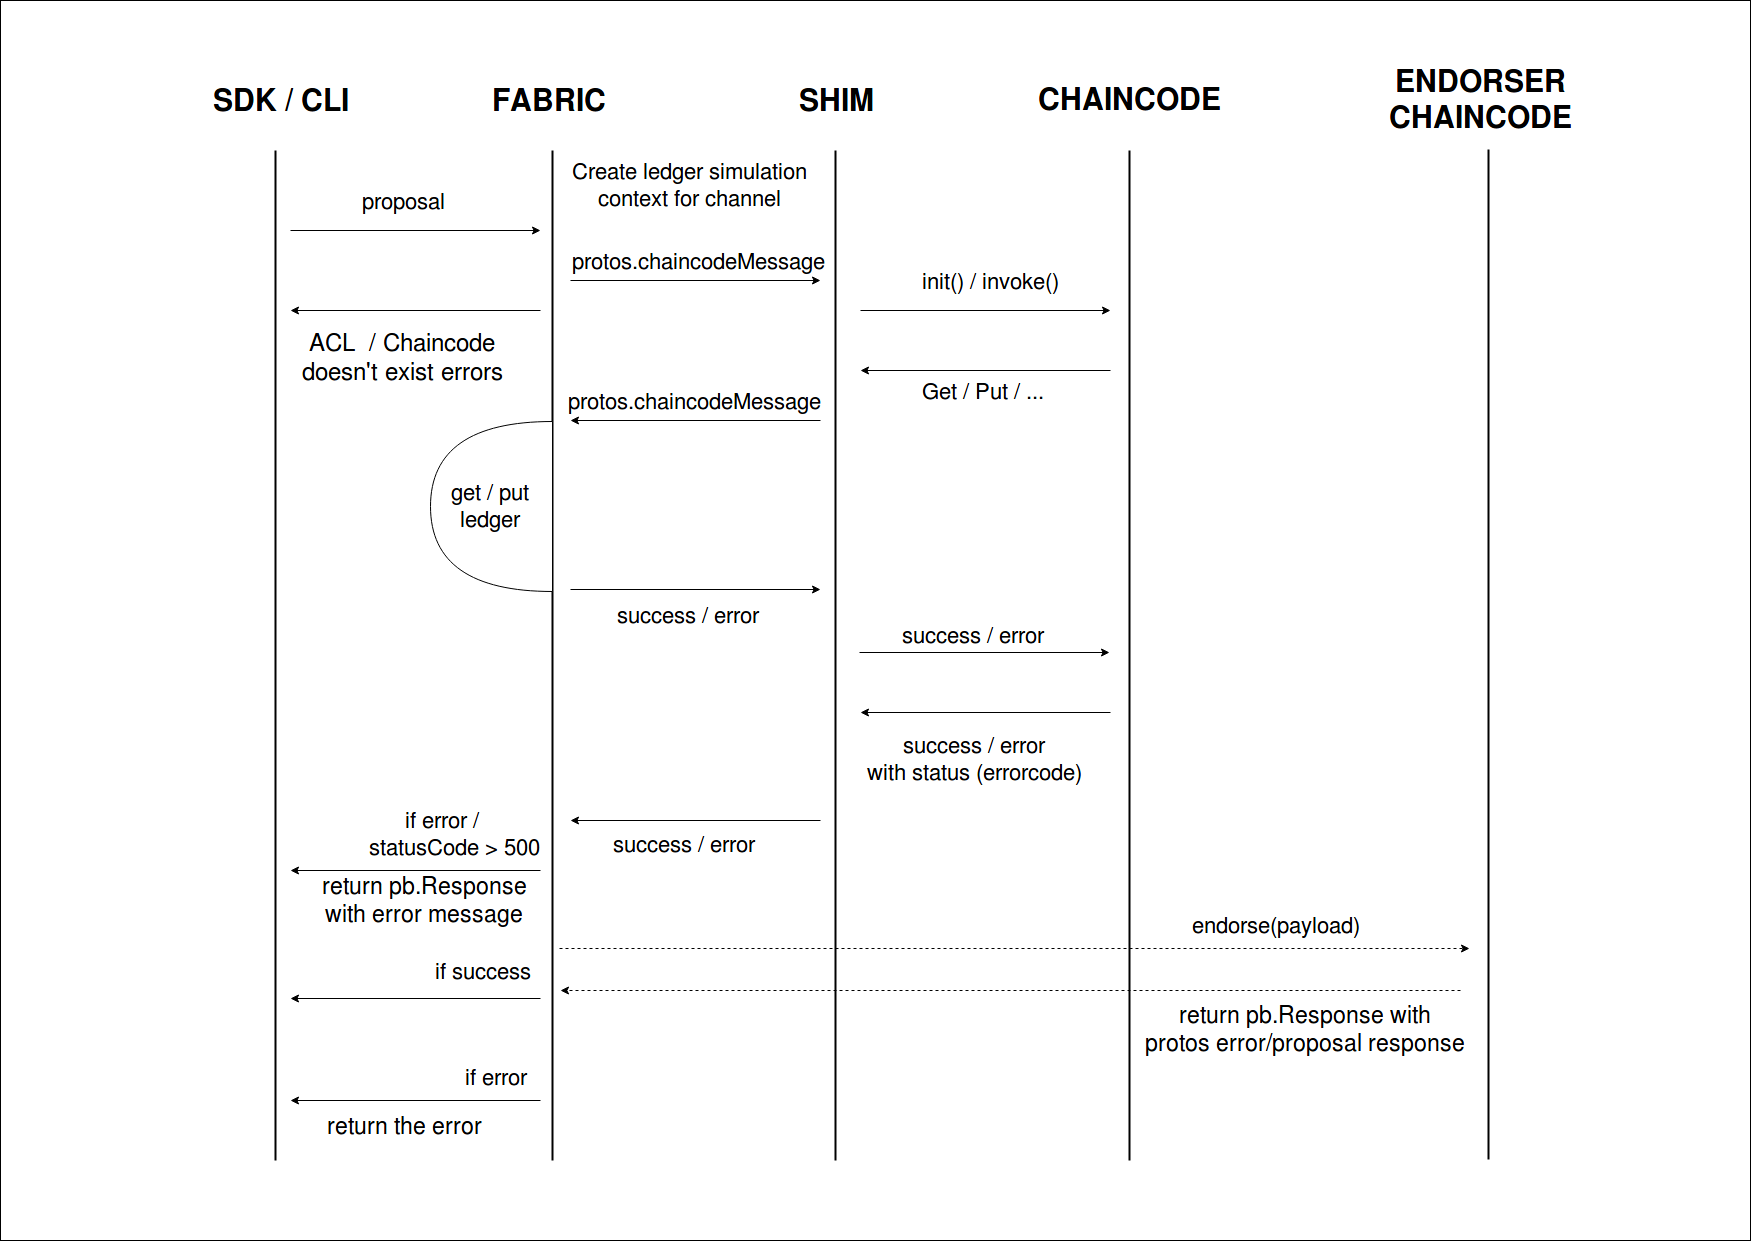
Chaincode Swimlanes
Deploy a chaincode
[WIP] - the CLI commands need to be refactored based on the new deployment model. Channel Create and Channel Join will remain the same.